Dodge SRT Forum banner

LCA polyurethane bushing install = pix

1 reading
24K views 73 replies 20 participants last post by  ValleyRacer  
#1 ·
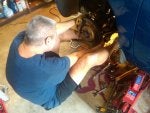
Today SRT4 whiz-kid mechanic Dave (Blazin) installed the Prothane front c-arm bushings on my ACR. Instead of reposting or rehashing the same old pix, let me share some of his install tips and tricks.
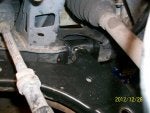
Firstly while removing the OEM arms, he very slightly bent the metal under the rear positioni bushing to make removal and reinstall easier - without having to move the strut.
Image

Image


Oh, then it doesn't hurt that he has a lift on the side of his garage
Image


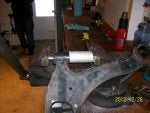
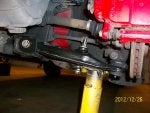
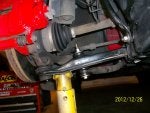
No surprises on the removal of the OEM arms, splash guard off, pencil strut off, lower motor mount off etc
Image


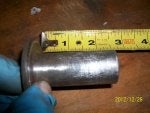
Then to facilitate the removal of the OEM bushings, Dave trimmed the overhang from the front bushing so the press could just completely squeeze out the bushing.
Image

Image


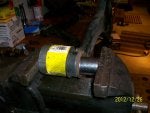
Then to protect the round flange edge on the OEM unit, and keep the press operation quick, Dave used his plasma torch to make a template tool so the arm could sit in the press without shifting. I'll upload a youtube video of this later
Image

Image

Image


No surpises on the REMOVAL of the OEM arms either - just an air wrench to get the long vertical and horizontal bolts out

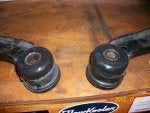
Then burn out the shell from the rubber and reuse. Let the rubber burn away until it crumbles out of the larger hold. Dave just squirted lighter fluid on the parts then finished up with a torch
Image


Then the wire sander to remove all excess burned rubber from the rear position reusable metal shell.
Image

Image


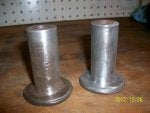
Putting the new PROTHANE bushings in is a snap, the rear are marked bottom and top and the contour of the bushing matches the profile on the OEM arms.
Image

Image

Image

Ditto for the barrel shaped bushing pair, once the press fully removes the OEM bushing by trimming the overhang with scissors (above photos) - it just pops in
Image

Image


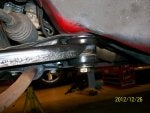
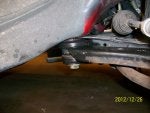
Then time to go back on the car:
Image

Image

A little rubber mallet tapping helped here. Then Lunch
Image


Since other postings described the pinch bolt, just paint mark the front of the bolt if you forget the orientation. Dave didn't have to fiddle with the struts or the axle by creating a little re-install room with the very slight bend in the metal at the rear. The bolt pulled it right back up on the reinstall. The ball joints popped back in with some pushing. The axles didn't pop out. The reinstall was completely clean.
Driving impressions: better steering response, less wheel jiggle, quicker braking, more ride control on the freeway, less sway. I like it

We also changed my brake fluid - pix on that later.
 
#5 ·
Very nice install and pix. Did you use the supplied grease on the bushings? They looked pretty clean. Man, what I would do for a lift at my house! Ahh! That must be awesome. Turning feels way better doesn't it!?

I spy with my little eye:
A missing hood scoop
A DC strut bar
A Red SRT
 
#8 ·
Grease packets VETOED


03REdSRT4 - you don't miss a thing!
A) the black PROTHANE bushings have graphite self lubricating compound in the material so Dave did a VETO on the grease packets based on his track experience - I didn't dare argue
B) my hood scoop is in the trunk waiting for a Dremel tool surgery
C) that strut bar is bent, but I have a strut bar to be installed with pix coming
D) that red SRT4 (a black one is next to it) belongs to a CA owner locally
 
#7 ·
I did a set of ES and prothane bushings and the prothane ones are 100x easier to do
 
#9 ·
Prothane consenus


Dave elaborated on the contours of the Prothane bushings vs ES and the Prothane marked top and bottom fit the OEM arms without any guesswork. I tried to capture that in a photo.
For some bizarre reason, I thought they were ES when I ordered them from Modern Performance, but they are in fact Prothane.
 
#13 ·
what did you guys do with the hub assem while reinstalling? it gets in the way and i was affraid the axle would pop out if i moved it to far :stab:
Capt. Obvious says, this is my first attempt at the LCA's :mopar:
 
#14 ·
axle will not pop out


You aren't putting force on the hub/axle or CV joint when reinstalling. On the photo where my finger is pointing upwards and touching the housing for the LCA, Dave bent the tab downwards just slightly to make the re-install easier. When you retighten the LONG bolt, the bent tab comes back to factory position.

Is the the answer to the question?
 
#16 ·
My car was on jacks when I did it. I placed a separate jack under the brake rotor to raise the spindle and had a friend help me push on it to drop it down into the control arm. It was a PITA.
 
#20 ·
I completely spaced out on mine was on a lift with easy access. 03redsr43 to the rescue again.
KBzPTGT did you get any install pictures you could add to the available pictures on the board?
I was to frustrated to take any pics. Plus i didn't have enough hands:lol:
My wife heard me cussing and came out to snap this pic :rofl:
 

Attachments

#26 ·
Well... one beer led to another, then another and so on:lol: Figured i better stop working on the car while i was ahead last night. I'll do the pass side today. It should be cake since i know some tips now. This thread helped . Thanks :thumbsup:
Still need to figure out the sway bar end link bushing layout :ninja:
 
#29 ·
nothing could be simpler

Still need to figure out the sway bar end link bushing layout :ninja:
Choose either energy suspension or Prothane. The polyurethane stack simply replaces the OEM shit stuff. One wrench on top, one on bottom, the OEM uncrews. The poly stack is a no brainer to install. Fits perfectly. Here's a glimpse of the rear.

Image


if my endlink install pix aren't in the suspension forum, I can email them to you - it's simple task
 
#27 ·
Lol. If I had a nickel for every beer I drank while working on my car. Wait :paranoid: I live in California. I DO have a nickel for every beer I drank! :lol:

You might wanna invest in some jack stands. And it is a royal PITA I agree.
 
#28 ·
:rofl::rofl:

i used to do the same thing, have a beer or case while working on the car.


and YES you need some jack stands man


nice pics and lil write up :thumbsup:
 
#30 ·
This thread reminded me of how much fun i had during my install LOL.....

Took be about 4 hours with no powertools and did this in the street


great write up
 
#31 ·
same here although i did have a garage. i couldn't find my breaker/cheater bar and didnt have enough ass to break the LCA bolts loose:gay: Had to give the 1/2" ratchet handle the beatdown with a mallet:thumbsup: That shit took forever it seemed:stab:
my failing attempt at aligning the hub with LCA :jester:
 

Attachments

#36 ·
Photobucket is annoying me

A press is needed to extract the rear most position bushing - see it HD here:

Also useful for the front position bushing, notice the flange guard:

Photobucket appears to be down, the files on my hard drive are too large for the attachment tool

I took the photos and video exclusively for the use of boardmembers, now I cant get the image hyperlinks:flame:

I"ll check photo-bucket-of cow shit a little later...............

There are some other photos posted by other board members if you search.....
 
This post has been deleted
#37 ·
Alignment is not affected


Well no more than 2 hours, as Dave is conversational, and his wife and family and neighbors are ever present. Phone rings, baby wants daddy, daughters are busy, Dave has new toys to share and will instruct you on many things.

The alignment though is actually unaffected, since the tie-rod bolt sets the alignment position and it's not moved or adjusted in the bushing install.
I didn't get my front aligned after the install; I waited over one year till I got new tires, lowering springs done and the settings were nothing to worry about.

So unless you need an alignment, dont' go get one. The front suspension will actually be MORE stable, less wobbly and have better wheel control. There is at least ONE INCH of vertical, horizontal and axial SLOP with the deteriorated OEM rubber. IT's appalling. You'll see.
 
#38 ·
time and money so worth it

Simon - one thing Blazin can do in about 10 minutes (as he did on my ACR) with the ABS pump software utiltiy on his little note-book is bleed your brakes with some new DOT4. You sit in the car on the lift and push the brake pedal, he pops around to each bleeder screw. Then connect to his notebook via serial cable under your dash. Beep Beep, blink blink, your ABS pump clears itself out.

$20, ten minutes, new brake fluid, solid pedal.

No way to change/flush brake fluid any cheaper or more conveniently.

I had this done to my 99 NEON too, when he installed the c-arm bushings on my NEON - 13 years late!
 
#39 ·
Simon - one thing Blazin can do in about 10 minutes (as he did on my ACR) with the ABS pump software utiltiy on his little note-book is bleed your brakes with some new DOT4. You sit in the car on the lift and push the brake pedal, he pops around to each bleeder screw. Then connect to his notebook via serial cable under your dash. Beep Beep, blink blink, your ABS pump clears itself out.

$20, ten minutes, new brake fluid, solid pedal.

No way to change/flush brake fluid any cheaper or more conveniently.

I had this done to my 99 NEON too, when he installed the c-arm bushings on my NEON - 13 years late!
Nope, I can easily flush my old DOT4 brake fluid myself Hahaha!
 
#42 · (Edited)
I just finished installing the Prothane bushings so here are some pics and description of how I did mine.

I first removed the big nut for the axle to allow the spindle to be moved around more freely. This also prevents the CV boots from getting ripped or the axle popping out of the trans.

To remove arms I took off all bolts, pulled arm out from frame, then pulled the arms down out of the spindle. With the axle nut loose it was easy.

I used a vice, some sockets, and some pipe to get the bushings out. They came out pretty easily but my vice is pretty big. On the smaller bushing I cut the rubber off the end with a hack saw so the pipe would fit up against the arm. The bushing got pushed into the pipe and was stuck in the pipe forever so I had to use two sections of pipe, one for each arm.
 

Attachments

#43 ·
The total length of the inner vertical bushing sleeve was 2 5/8" end to end. I used a hack saw to cut rubber off inner sleeves, then heated with heat gun and used a box cutter to get some more rubber off, then finished getting rest off with 80 grit sand paper. I also scraped all rubber out off vertical bushing area of control arm with box cutter and heating rubber with heat gun followed up with 80 grit sand paper. Smoothed the outside surfaces down too. The smaller bushing came out clean so no prep needed there.
 

Attachments

#44 ·
Here are the bushings installed in the arms. I noticed there was a 1/16" gap between the two vertical bushing halves where they meet in the arm. The inner vertical bushing sleeve was also about a 1/16" short when installed. So in the car the vertical bushing is being squeezed about 1/16".
 

Attachments

#45 · (Edited)
To install I first bent vertical bushing frame down, then put vertical bushing in first with bolt just through lower hole, slid ball joint stud into spindle, install ball joint bolt/nut hand tight, then slid front bushing into place and installed front bushing bolt/nut hand tight. Then I jacked up suspension by placing jack under rotor, then I twisted vertical bushing bolt outward to line up with hole in frame, then worked bolt into frame. Then before tightening vertical bushing I put jack stands under the control arms by the ball joint. Because the inner sleeve is 1/16" shorter then the uncompressed bushings the bushings only get squeezed 1/16" which is just enough to keep tension on them.
 

Attachments

#52 ·
Things of beauty


Here are the vertical bushings with the tires back on the ground. They do not look squished and no gaps:
69cuda340 - very nice job on the install - when the car is level again, turn the wheels all the way in one direction, so you can get to the end links, and ever so slightly, snug the bolt up until the nylon insert in the bolt is snug.
No need whatsoever to overtighten.